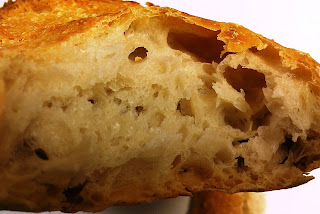
Homemade bread is intimidating. I grew up on Bunny and Wonder, but fell in love with fresh baked bread courtesy of Panera while I was in college. One of my friends bought me The Joy of Cooking, and after staring longingly at the loaves (a 45 minute drive away from my house) and begrudgingly at the cookbook for about two years; I took the plunge into baking bread at home. I love it. I won’t ever go back.
Not only is making bread at home rewarding, it is also cheap. The recipe I am going to share only costs about .55 a loaf in dry ingredients. You can’t beat that!
Now, I am not a professional baker by any means. I’m still trying out new recipes at every turn, but I have tried about ten different recipes for everything from whole grain sandwich bread to nice Artisan bread like what I love at Panera. It has been one heck of a journey. Something about reading a recipe that says “knead until elastic” and trying to replicate it with no experience whatsoever was a bit, “challenging” (feel free to read that as curse inducing). Honestly, what is the baking definition of elastic? Knead thoroughly, but do not overwork, too much kneading will result in poor texture! There aren’t even any pictures to show what is elastic, or shiny, or whatever other baking jargon they have that I had no clue what it meant as a virgin baker. Agh! Talk about feeling overwhelmed.
That’s why I love this recipe, courtesy of Mother Earth Living. It gives a perfect loaf of bakery quality Artisan style bread every time, and there is no kneading! Let me tell you. This stuff is too good to be true. The baking gods will smile upon you and you too will fall in love with homemade bread!
Time commitment: Working time 10 minutes, Raising time 12-24 hours, Working time 10 minutes, Raising time 2-4 hours, Preheating time 20 minutes, Baking time 30-45 minutes
The ingredients are so straight forward that I have them memorized at this point.
¼ tsp yeast
1 ½ tsp salt
1 ½ c warm water
3 c flour, plus more for dusting your working surface and hands
You’ll also need cling wrap, kitchen towels, an oven, and a Dutch oven.
Add the salt and flour and stir with a non metal utensil until combined. This stuff is sticky, and yields a very moist, shaggy dough.
Cover it with cling wrap. I find that a rubber band can help keep the wrap on, which is important because this dough is going to sit for a loooong time. The recipe calls for 12-18 hours. I have left it raise for 24+ without problems.
 |
| The dough will rise to fill the bowl. The bubbles show that it is ready. |
After the dough has risen flip it out onto a well floured surface, and make sure to dust your hands! Flip it over itself twice and shape it into a ball. Lay it on a well floured towel and cover with yet another floured towel (or floured, inverted bowl) to raise again 2-4 hours. I use the towel if I am home and will be able to work with the bread after two hours of raising, but if I have to leave it longer than two hours (I have done up to four) I use a bowl to better retain moisture.
So, you’re ready to bake? Pull out your Dutch oven and shove that baby in the oven while it is preheating to 475 degrees. The Dutch over retains moisture while you’re baking that replicates the steam injections that professional bakers use. After about twenty minutes pull out the Dutch oven and turn the bread into it. It will fall a bit, but that is okay. The baking process will even it out. Cover it and bake for thirty minutes. Uncover and cool, or let brown for an additional 10-15 minutes as you prefer.
 |
| It's a baking montage! |
PS: If you want to check out the original recipe on Mother Earth Living here you go!


No comments:
Post a Comment