Wednesday, February 27, 2013

DIY Artisan Bread, with pictures!

Homemade bread is intimidating. I grew up on Bunny and Wonder, but fell in love with fresh baked bread courtesy of Panera while I was in college. One of my friends bought me The Joy of Cooking, and after staring longingly at the loaves (a 45 minute drive away from my house) and begrudgingly at the cookbook for about two years; I took the plunge into baking bread at home. I love it. I won’t ever go back.

Not only is making bread at home rewarding, it is also cheap. The recipe I am going to share only costs about .55 a loaf in dry ingredients. You can’t beat that!

Now, I am not a professional baker by any means. I’m still trying out new recipes at every turn, but I have tried about ten different recipes for everything from whole grain sandwich bread to nice Artisan bread like what I love at Panera. It has been one heck of a journey. Something about reading a recipe that says “knead until elastic” and trying to replicate it with no experience whatsoever was a bit, “challenging” (feel free to read that as curse inducing). Honestly, what is the baking definition of elastic? Knead thoroughly, but do not overwork, too much kneading will result in poor texture! There aren’t even any pictures to show what is elastic, or shiny, or whatever other baking jargon they have that I had no clue what it meant as a virgin baker. Agh! Talk about feeling overwhelmed.

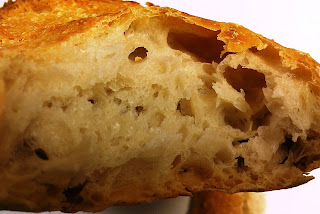
That’s why I love this recipe, courtesy of Mother Earth Living. It gives a perfect loaf of bakery quality Artisan style bread every time, and there is no kneading! Let me tell you. This stuff is too good to be true. The baking gods will smile upon you and you too will fall in love with homemade bread!

Time commitment: Working time 10 minutes, Raising time 12-24 hours, Working time 10 minutes, Raising time 2-4 hours, Preheating time 20 minutes, Baking time 30-45 minutes

The ingredients are so straight forward that I have them memorized at this point.
¼ tsp yeast
1 ½ tsp salt
1 ½ c warm water
3 c flour, plus more for dusting your working surface and hands
You’ll also need cling wrap, kitchen towels, an oven, and a Dutch oven.


Dissolve your yeast in the warm water, this normally takes about five minutes for me. I stir the water after the yeast dissolves to mix everything up. It isn’t crucial, but it gives me peace of mind.


Add the salt and flour and stir with a non metal utensil until combined. This stuff is sticky, and yields a very moist, shaggy dough.


Cover it with cling wrap. I find that a rubber band can help keep the wrap on, which is important because this dough is going to sit for a loooong time. The recipe calls for 12-18 hours. I have left it raise for 24+ without problems.

The dough will rise to fill the bowl. The bubbles show that it is ready.
After the dough has risen flip it out onto a well floured surface, and make sure to dust your hands! Flip it over itself twice and shape it into a ball. Lay it on a well floured towel and cover with yet another floured towel (or floured, inverted bowl) to raise again 2-4 hours. I use the towel if I am home and will be able to work with the bread after two hours of raising, but if I have to leave it longer than two hours (I have done up to four) I use a bowl to better retain moisture.


So, you’re ready to bake? Pull out your Dutch oven and shove that baby in the oven while it is preheating to 475 degrees. The Dutch over retains moisture while you’re baking that replicates the steam injections that professional bakers use. After about twenty minutes pull out the Dutch oven and turn the bread into it. It will fall a bit, but that is okay. The baking process will even it out. Cover it and bake for thirty minutes. Uncover and cool, or let brown for an additional 10-15 minutes as you prefer.


It's a baking montage!
Make sure to let it cool for at about an hour before slicing, because the center is still baking and you don’t want to let the heat and moisture out. It will be tempting to take a nibble, but resist! I have tried both ways and waiting is worth it. After the bread cools, enjoy! This stuff is so great it doesn’t even need butter. Not that I am discouraging butter, but I can say that my test kitchen (co-workers) ate half a loaf completely plain, and that NEVER happens.


PS: If you want to check out the original recipe on Mother Earth Living here you go!

Monday, February 25, 2013

WWE, Farm Style

It might be February, but spring is in the air.
Is it the longer days, or the warming weather that tells me this? No. It is the fact that the tractor is being impeded by the bulls arguing over who is the better man.

Bull fight! Seriously better than WWE. My money is on Brisket, though Dale does hold his own pretty well.

Friday, February 22, 2013

Farming Foible or Agrarian Adventure?

I am what you might call an accidental gardener. I was bred, born, and raised on a farm, but I have an intense aversion to getting dirty. Mess with cows and horses? Any day! But gardening was something that my grandparents did. Canning? Pah. Why, when I could go to the store and buy a .25 can of corn? Baking and cooking were things that I have always enjoyed, and I’m going to blame them for my recent garden obsession.

It started with a windowsill box of herbs for cooking. I was sick and tired of paying five dollars or more for a tiny bunch of basil. Watching the tiny green sprouts of basil and garlic chives changed something in me. The next year I had a full out herb garden. The year after? Well, let’s just say that I didn’t do my research and jumped into vegetable gardening with abandon. There may or may not have been an overabundance of zucchini at my house. (Who knew five plants would produce that much, other than every other gardener in the history of the world? In fact I may or may not have had zucchini in some way shape or form two meals a day for about three months.) Faced with the bumper crop of herbs, fruits, and vegetables I had to figure out what to do with it all. A few frantic phone calls to my grandpa later and I was officially canning jams and jellies, making flavored oil, and learning how to best freeze pesto and dry squash. Just like that I fell into it. And now I can’t imagine my life without digging around in my garden despite the mess. I have learned a few tricks along the way, and I’m sure there are going to be many more to learn as I go.

This year is going to be different. This year I have a plan. I know that dish soap under my nails will keep dirt from getting in them. I know that I am going to be inundated with squash and zucchini and delicious tomatoes. I have researched and plotted. I have studied companion planting books and seed catalogs. I have literally spaced out my garden on graph paper according to how it should grow best.

And I am positive that I will continue to muck it up, and I will be overwhelmed and it will be under watered, and that my garden will grow regardless. That’s one of the best things about gardening. It puts it all in perspective. It is humbling and empowering at the same time.

So I invite you to join me farmer, gardener, or none of the above as I set out to grow some produce, learn to use it, and hopefully grow and learn as a person in the process. I hope my tales are entertaining, enlightening, and well, enlivening.

But enough of the tree hugging, earth loving bit. Let’s go grow something! (Like seed catalog debt. Since, you know, it is February and I can’t plant anything inside because my cats keep eating all my seedlings.) Or take cow pictures! Because who doesn’t love cow pictures?

See, isn’t that precious?

Or we could bake something:
Because well, bread is AWESOME.

So many things to do, so many posts to write! Until next time!